Introduction
Welcome to the wonderful world of playing the guitar! Guitar playing is a rich and rewarding experience, if you enjoy the soothing sound of an acoustic or the booming riffs of an electric guitar. As a new player, you might have heaps of information to draw upon, but fear not—our guide will have it all covered.
From choosing the ideal guitar to learning your first chords and tunes, we will walk you through every step of the process. You will have the basics in your pocket to play the guitar confidently after completing this article.
Step 1: Selecting your first Guitar
Before you play your very first chords, you will need to decide on the correct guitar. Two guitars are fine places to start: acoustic and electric. Let us divide them:
Acoustic Guitars
- perfect for beginners: Acoustic guitars are a good starting point. They are all-around, need no amp, and are okay to play while being in relaxed situations.
- Tone: Without the aid of an amplifier or pedal, acoustic guitars provide a warm, earthy tone.
- Simplicity of learning: Despite the thicker strings, most novices find that playing an acoustic guitar is simple after they have developed finger strength.
Electric Guitars
- Perfect for pop, rock, and metal: Electric guitars are perfect for musicians that enjoy performing pop, rock, or blues. To generate sound, they require an amplifier, which might be somewhat expensive up front.
- Less finger pressure to press the strings: The strings on the electric guitar are thinner, so slightly less pressure to press them down for the beginner, particularly if you are not strong in the finger department.
- Amplification: The biggest difference is that you will require an amp, which could cost you an arm and a leg, but wonderful if you are going to play with your friends or jam.
If you aren’t sure how to begin with the one, then I’d say begin with an acoustic guitar because it is easy and it doesn’t require any other instrument.
SlNo. | Description | Link |
1 | Juârez Acoustic Guitar Kit, 38 Inch Cutaway, 038C with Bag, Strings, Pick and Strap, Black | |
2 | Yamaha F280 Acoustic Rosewood Guitar (Natural, Beige) | |
3 | Kadence A281 Professional Acoustic Rosewood guitar (Natural, Beige) | |
4 | Kadence BB01 Dreadnought Acoustic Guitar + (free online learning Course) – Sunburst |
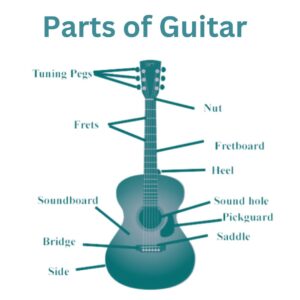
Step 2: Get familiar with the parts of the Guitar
Getting familiar with the basic parts of the guitar will enable you to learn instructions quickly as well as lessons.
- Body: The big, hollow section of the guitar producing the sound. On an electric, it’s composed of solid or semi-solid design.
- Neck: The long, thin part of the guitar that connects the headstock and body.
- Headstock: The guitar’s top, which houses the tuning pegs.
- Frets: Tiny metal parts that run the length of the neck. The pitch of the note being played is lowered by picking between the strings’ downward frets.
- Strings: Six guitar strings, enumerated from 1 (high E) to 6 (low E).
- Bridge: The location of the strings’ pins to the guitar’s body.
- Electric guitar pickups: These are the parts that convert string vibrations into electrical signals that can be amplified.
Step 3: Learn to play the Guitar comfortably
Now that you have chosen your instrument, it is time to adjust to it. The following easy pointers can help you become more at ease when handling and playing your guitar:
Holding the Guitar
- Sitting: Sit up straight with the body of the guitar against your leg. The guitar should be set at an angle so that your left hand can easily play the frets while your right hand may freely strum over the soundhole or pickup region.
- Standing: If you play while standing (especially with an electric guitar), use a guitar strap to support the weight of the guitar. Hold the guitar at a comfortable level so you can play without straining.
Positioning Your Hands
- Left hand (for right-handed): Put thumb at back of the neck. Press fingers against strings between frets, but not on metal fret. Relax curled fingers so you don’t apply extraneous tension.
- Right hand (for strumming): If playing with pick, hold pick between index finger and thumb. Have relaxed wrist while strumming.
Step 4: How to tune your Guitar
You should practice tuning your guitar before playing. Playing with an untuned guitar is horrid!
Standard Tuning (EADGBE)
This is the most common tuning used on a guitar, and this is how standard tuning goes from lowest to highest:
- 6th string (Low E): The bottom thickest string, or low E.
- 5th string (A): The next thickest strings.
- 4th string (D): The next one.
- 3rd string (G): The middle.
- 2nd string (B): The second most thin string.
- 1st string (High E): The thinnest.
Tuning Methods
- Tuner: The simplest way to tune your guitar is with an electronic tuner. Just put it on the headstock and strum all of the strings. The tuner will indicate whether or not the string is too high (sharp) or too low (flat), and you turn the tuning pegs the other way.
- Apps Tuning: There are all kinds of free apps which can tune your guitar with just the microphone.
- Ear Tune: Once you achieve an acceptable standard, you should be able to tune the strings by ear with the 5th fret trick, but when starting out, you have to employ an electronic tuner.
Step 5: Learn basic Guitar chords
Here we come to the fun stuff—learning your first chords! Chords are what a vast majority of songs are built upon, and when you’re aware of them, you’ll be able to play a thousand or more tunes.
Begin with Open Chords
Open chords are the simplest chords where some strings are played without the frets being pressed down (these are called “open strings”). Some easy chords to start with are:
- C Major
- Place your index finger on the first fret of the B string (second string).
- Place your second finger on the second fret of the D (4th) string.
- Place your third finger on the third fret of the A (5th string).
2. G Major:
- Place your second finger on the third fret of the low E string (the sixth string).
- Place your first finger on the second fret of the A (5th string).
- Place your third finger on the third fret of the high E string (the first string).
- Strum all the strings.
3. D Major
- Place your first finger on the second fret of the G string (the third string).
- Place your second finger on the second fret of the e string (first string).
- Place your third finger on the third fret of the B string (the second string).
- Strum only the top four strings (D, G, B, and e).
- E Major:
- Place your first finger on the first fret of the G string (the third string).
- Place your second finger on the second fret of the A (5th) string.
- Place your third finger on the second fret of the D (4th) string.
- Strum all six strings.
- A Major:
- Place your first finger on the second fret of the D (4th) string.
- Place your second finger on the second fret of the G string (the third string).
- Position your third finger on the second fret of the B string (2nd string).
- Strum down from the A string (5th string).
Practice Switching Between Chords
Moving from chord to chord can feel stilted and awkward at the beginning, but you will grow more comfortable and faster with repetition. Start out by practicing changes between C Major, G Major, and D Major.
Step 6: Master basic strumming patterns
Strumming is the basis for guitar playing. To build rhythm, begin with simple and fundamental down and up strokes.
Downstrokes
Downstroke is strumming from top string (low E) to bottom string (high E) in a single smooth stroke. Master it on open chords.
Upstrokes
Strumming from low (high E) to high (low E) is the opposite of upstroke. To create a more rhythmic strumming pattern, alternate between downstrokes and upstrokes.
Apply this simple pattern to a song:
- down, down, up, up, down, up
Step 7: Play your first song
Now that you’ve got a couple chords and strumming patterns under your belt, it’s time to put what you’ve learned into practice on your first song. A good one to start with is the old children’s lullaby “Twinkle Twinkle Little Star” that only uses the C and G chords.
Twinkle Twinkle Little Star (Chords):
- C (Twinkle, twinkle)
- G (little star)
- C (How I wonder)
- G (what you are)
Play a few more songs with the chords you’ve been practicing after you feel confident with that. Below are some simple songs:
- “Horse with No Name” by America
- “Stand by Me” by Ben E. King
- “Ripple” by The Grateful Dead
Step 8: Practice and have fun!
The key to becoming a great guitarist is consistent practice. Practice for 15 to 30 minutes per day and keep pushing yourself with new chords, songs, and styles. And remember to have fun! Guitar playing is meant to be joyful, so relax, have fun, and celebrate tiny accomplishments.
Conclusion
Learning guitar can feel daunting at first, but with patience, practice, and the right approach, you’ll see steady progress. Start by choosing the right guitar, getting familiar with the instrument, and mastering the basics. Once you’re comfortable, move on to learning songs and refining your technique.
Remember: All great guitarists started somewhere—so enjoy the ride!