
Table of content
Proper Guitar Posture and Holding Techniques
Get Ready to Play: How to Tune the Guitar
Start Strumming: Basic Strumming Techniques
Simple Fretting Exercises for Finger Dexterity
Learn Basic Chords: The Building Blocks of Guitar
Work on Basic Rhythms and Begin Singing!
How to Read Chord Diagrams and Tabs
Build Speed and Accuracy: Practice Makes Perfect
Introduction to Basic Strumming Patterns
Practice, Patience, and Persistence: The Key to Success
Intoduction
For many, playing the guitar is a dream come true. It can be both thrilling and scary to begin this adventure, whether it is learning how to play your favourite songs on a guitar or just using music as a creative outlet. The optimistic news? Even if you’ve never touched a guitar before, you can learn the fundamentals and even perform your first song in just 30 days with a disciplined practice schedule and methodical approach!
From learning how to sit and handle the guitar to tuning, strumming, and playing easy tunes, we’ll cover all you need to know in this comprehensive blog. In just one month, you will be able to perform a song if you adhere to this instruction, practise regularly, and maintain your commitment!
Step 1: Proper Guitar Posture and Holding Techniques
Make sure you’re comfortable with the guitar before you play a note. Let’s start with the fundamentals because you’re playing can be greatly impacted by how you sit and handle the guitar.
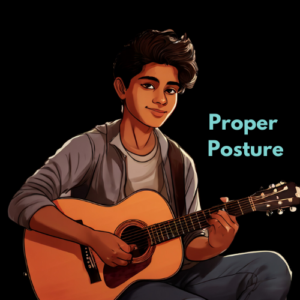
How to Sit:
- Choose a chair that is comfortable for you. Ensure that your back is straight but that you are sitting erect.
- Plant your feet firmly on the ground. Your knees should be at a straight angle for improved balance.
If you are a right-handed person, rest the guitar on your right thigh; if you are a left-handed person, place it on your left thigh. Traditionally, classical guitarists place the guitar on their left thigh, but for the time being, go with what is most comfortable.
How to Hold the Guitar:
• Body position: Place the guitar’s body against your chest while holding it.
• Neck and fretboard: Position your fretting hand—the hand that presses the strings—around the guitar’s neck with the neck inclined slightly upward.
• Strumming hand: Depending on whether your guitar is an acoustic or an electric, your strumming hand should be slightly above the sound hole or the pickups.
Step 2: Get Ready to Play: How to Tune the Guitar
One of the most crucial things to do before you begin playing is to tune your guitar. A well-tuned guitar will guarantee that the notes you play sound correct. A properly tuned guitar is the best place for beginners to start.
How to Tune Your Guitar:
6 strings make up a guitar; the thinnest string is marked 1 and the thickest string is numbered 6. These strings are often tuned as follows, going from low to high:
- 6th string (thickest): E (low E)
- 5th string: A
- 4th string: D
- 3rd string: G
- 2nd string: B
- 1st string (thinnest): E (high E)
Using a Tuner:
- Clip-on tuners: These fasten to your guitar’s headstock and sense each string’s vibration. The tuner will indicate whether the pitch is too high (sharp) or too low (flat) by plucking a string. To get that string precisely in tune, turn the tuning peg.
- Tuning Apps: There are a plethora of free guitar-tuning apps for smartphones that function similarly to a clip-on tuner. Just pluck a string, and the app will lead the way.
Tuning Tip:
- To get the right note, always tune your strings upward. To make sure the string stays in tune if you go past the note, tune down and then back up.
Step 3: Start Strumming: Basic Strumming Techniques
Your guitar should be in tune now, so let’s start learning how to strum.
Using Your Right Hand to Strumming:
- Grip the pick (optional): If you’re using a guitar pick, place it between your thumb and index finger. A gentle grip will enable the pick to go smoothly across the strings; little force is required.
- Align your hand: Keep your hand just above the sound hole and maintain a relaxed wrist.
- Strumming motion: Make smooth, calm movements with your wrists as you move them up and down. Aim to maintain a steady forearm and concentrate on making most of the movement with your wrist.
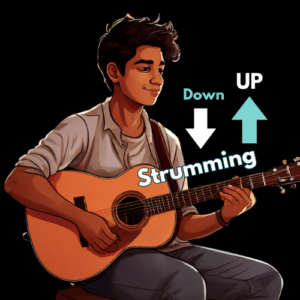
Strumming Pattern:
For beginners, a basic “Down-Up” strumming pattern works well:
• Begin by plucking each of the six strings.
• Raise your hand one more and pluck the strings higher.
• Exercise: Stroke steadily downward and upward, aiming for even, fluid strokes.
Step 4: Simple Fretting Exercises for Finger Dexterity
It’s time to bring your fretting hand into the mix now that you’re at ease with strumming.
How to Fret Notes:
Holding down the strings: Instead of pressing directly on the fret, which is the metal strip on the guitar neck, your fingers should be placed just behind it.
- Use your fingertips: This technique aids in producing a distinct sound without muted neighbouring strings.
Simple Exercise:
• To begin, place your index finger on the low E string’s first fret (the sixth string), then strum.
Then, strum the string once again while placing your middle finger on the second fret.
• Proceed across the neck, repeating this for each of the six strings.
Your fretting hand will become more flexible and strong after performing this workout. You can increase your finger independence by doing this every day.
Step 5 : Learn Basic Chords: The Building Blocks of Guitar

Chords are combinations of notes played together, and they are essential to playing songs.
Three Easy Chords for Beginners:
- E Minor (Em):
- Place your middle finger on the 2nd fret of the 5th string.
- Place your ring finger on the 2nd fret of the 4th string.
- Strum all six strings.
- C Major (C):
- Place your index finger on the 1st fret of the 2nd string.
- Place your middle finger on the 2nd fret of the 4th string.
- Place your ring finger on the 3rd fret of the 5th string.
- Strum from the 5th string down (avoid the 6th string).
- G Major (G):
- Place your middle finger on the 3rd fret of the 6th string.
- Place your index finger on the 2nd fret of the 5th string.
- Place your ring finger on the 3rd fret of the 1st string.
- Strum all six strings.
Step 6 : Work on Basic Rhythms and Begin Singing!
Now that you know a few chords, you can begin to play easy songs. Learning well-known children’s songs or folk tunes is a great way to practise because they frequently only require two or three chords.
Here are 5 Easy Songs to Get You Started:
The song “Twinkle, Twinkle, Little Star” employs chords in C and G.
• G and C chords for “Row, Row, Row Your Boat”
• “Happy Birthday”: chords in G, D, and C.
• chords in G and C for “Mary Had a Little Lamb”
• “Jingle Bells”: chords in G, C, and D.
Step 7. How to Read Chord Diagrams and Tabs
You’ll often come across chord diagrams and tablature (tabs) when you begin studying new tunes.
Understanding Chord Diagrams:
Chord diagrams illustrate where your fingers should be placed on the guitar fretboard.
• The strings are represented by the vertical lines (first to sixth from left to right).
• The frets are represented by the horizontal lines.
• Numbers (1 = index, 2 = middle, etc.) designate which finger to use, while dots reveal where to place your fingertips.
examining tabs
Tabs are a more straightforward method of reading music, especially for the guitar.
• The six lines on Tabs each correspond to a guitar string.
• The numbers on the lines indicate which string’s fret to press.
Step 8. Build Speed and Accuracy: Practice Makes Perfect
It is important for a beginner to practise on a regular basis. Try to spend at least half an hour each day performing the following exercises:
- Chord changes: Get comfortable making fluid chord changes.
- Strumming patterns: Pay attention to maintaining a constant beat.
- Finger exercises: Develop dexterity and strength.
Step 9. Introduction to Basic Strumming Patterns
You may add additional rhythm and variation to your playing by introducing alternative strumming patterns once you’ve learnt a few chords.
Simple Strumming Pattern for Beginners:
Using chords you’ve learnt, practise this pattern slowly at first, then progressively pick up the speed. D-D-U-U-D-U (Down, Down, Up, Up, Down, Up).
Step 10. Practice, Patience, and Persistence: The Key to Success
Developing skill in the guitar takes time. It calls for perseverance and commitment. Prioritise the fundamentals and then progressively expand upon them. You’ll notice gradual progress if you can commit a little time each day.
Step 11. Unlock Your First Song in 1 Month
Within a month, if you practise the following exercises and procedures on a regular basis, you should be able to perform your first complete song. Beginners should start with songs like “Stand By Me” by Ben E. King or “Knocking’ on Heaven’s Door” by Bob Dylan because they just require a few chords and simple strumming patterns.
Step 12. Final Tips for Beginners:
- Tune your instrument before every session: Acquiring a good ear for music is ensured by playing on a well-tuned guitar.
- Break it down: If you’re having trouble with something, divide it up into easier-to-manage chunks.
- Have patience: You will reach your goals with persistent practice, as every guitarist started out as a beginner.
- Remind yourself of the purpose of your education while you watch performances, listen to music, and stay inspired.
In conclusion, the journey has begun!
Being a beginner guitarist is an exciting and fulfilling adventure. In just one month, if you follow the instructions in this tutorial and make practicing a daily habit, you’ll be playing your favourite tunes! Recall that consistency is essential. Your musical objectives are closer to reach with each practice session.
Are you prepared to move forward? 🎸
Join a community of enthusiastic learners by enrolling in Music360’s Guitar for Beginners course right now if you’re seeking for more in-depth advice and assistance! Enrol right now to start realising your guitar-playing potential!